Working with Claims
Inquiring About or Updating Item Information
Adding Invoice Information to a Claim
Adding Labor and Installation Costs
Adding Manufacturer Information
Printing a Single Claim Report
Changing the Status of a Claim
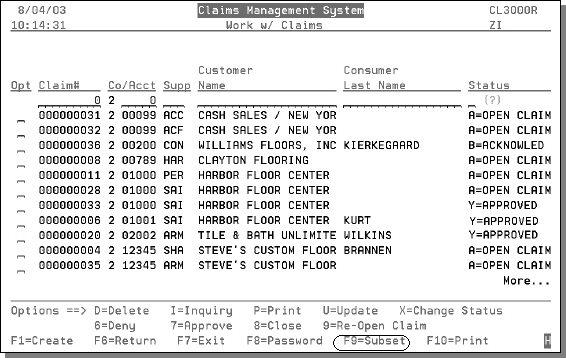
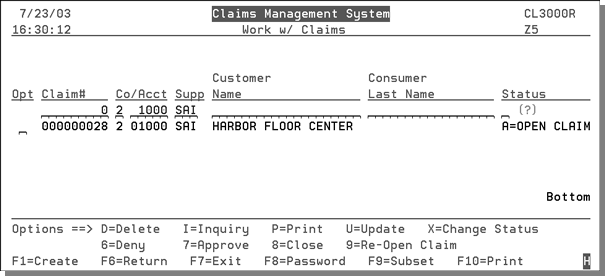
On the Work with Claims menu (option 1 - Work With Claims) you can inquire about claims, or if you have the authority you can enter a password to perform several other functions. The Work with Claims program is the central program for entering and managing claims. The claims options, including the additional functions that require a password are shown circled in the figure below.
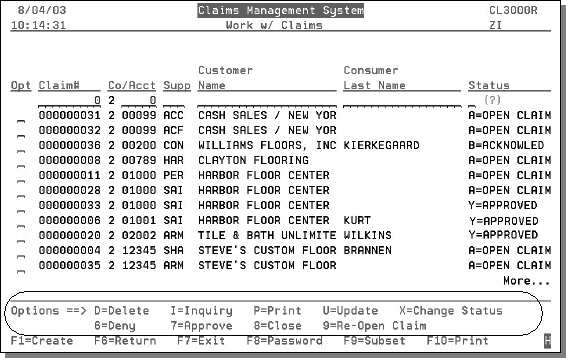
You can enter all or part of a parameter in any field at the top of the columns to find specific claim records. For example, enter A in the status field to review only open claims. You can perform advanced searches using the F9=Subset feature.
Creating a Claim
If you have the authority, you can create a claim.
- On the Work With Claims screen, press F1. The Create New Claim screen appears.
- Enter a Supplier#, Supplier Claim #, Company #, and an Account #. An entry is required in all these fields except the Supplier Claim#. The Supplier Claim number may be entered later, when and if the supplier issues their tracking number for the claim.
- To display a listing of available values enter ? in the field.
- A Claim number is generated automatically.
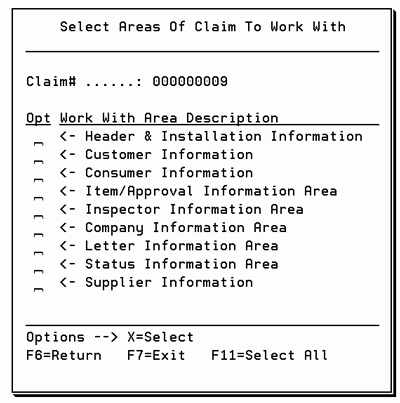
- Press Enter. The Select Areas of Claims to Work With screen appears. This screen lets you enter data into particular areas of the claim.
- Enter X to select an area of the claim, and complete the fields, as necessary. Most of these areas of self-explanatory.
Updating a Claim
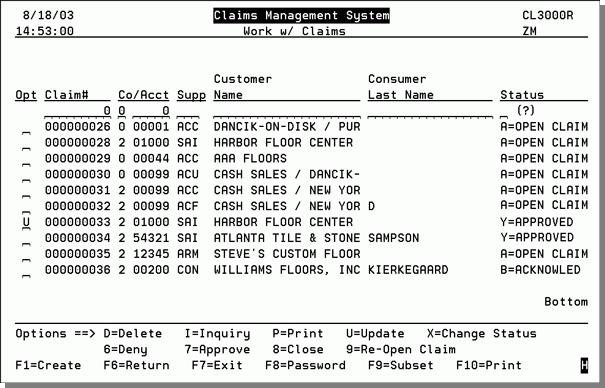
- Enter a U in the Opt column of the claim you want to update.
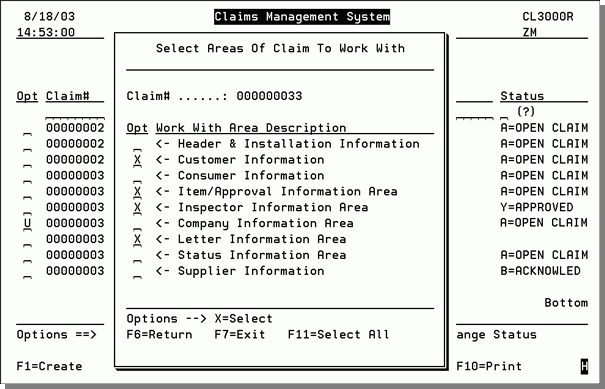
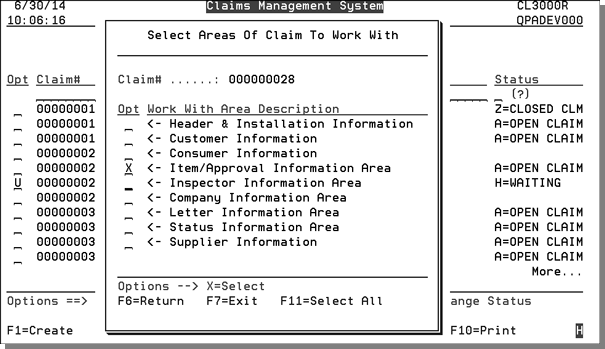
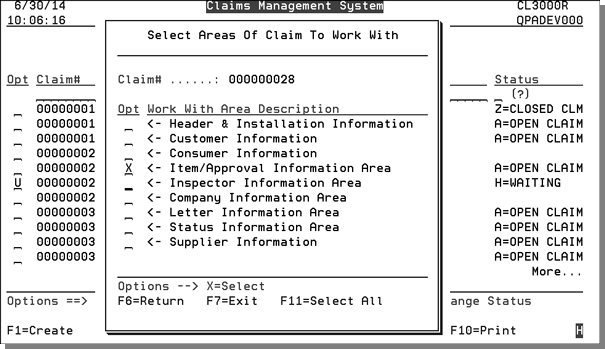
- The Select Areas of Claim To Work With window pops up. Select the areas you want to update.
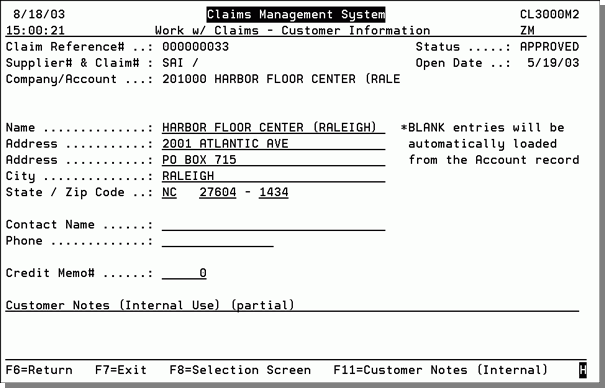
- The next series of screens to appear is based on your selections. In this example, the Customer Information screen appears.
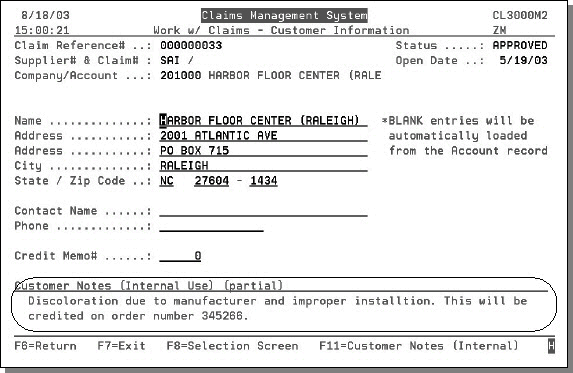
- Press F11 to enter and update notes regarding the customer.
- Press Enter to return to the Customer Information screen with the customer notes inserted.
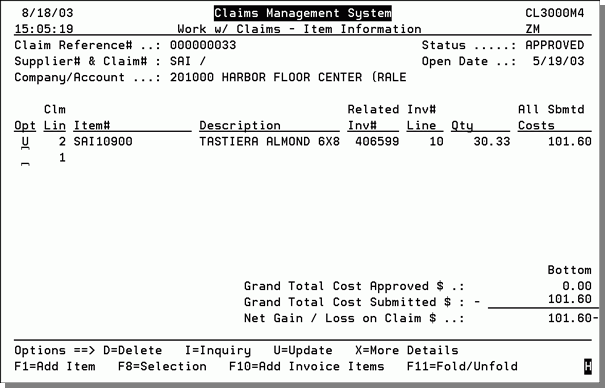
- Press Enter to proceed to the item information area. Enter a U to update the item information.
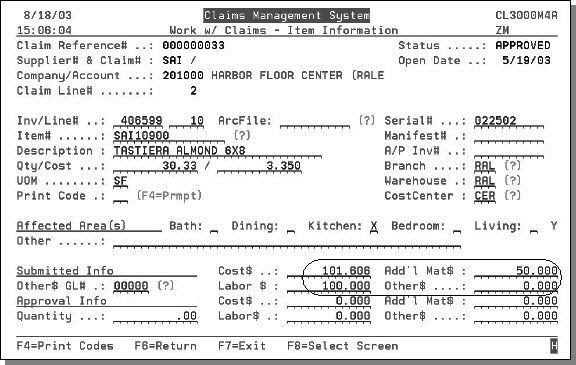
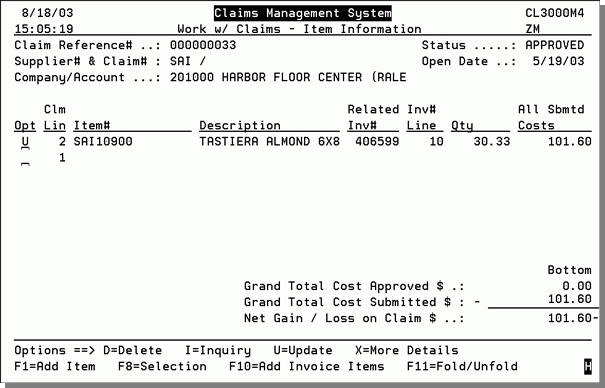
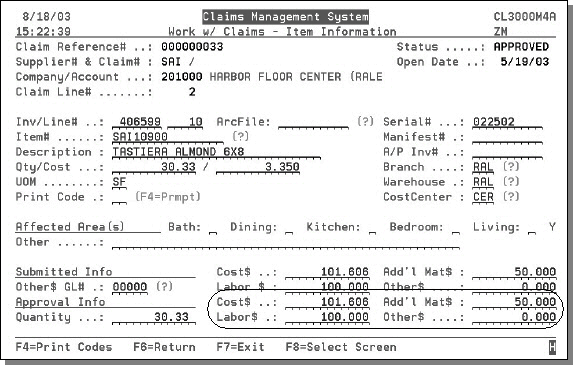
- Press Enter to access an item detail screen where you can enter information about the item. In the following figure, cost information was entered. The material cost of 3.35 is multiplied by the quantity of 30.33 SF, to come up with the 101.606 of material cost. The user added 50.00 of additional material and 100.00 of labor, all to be submitted to the supplier.
- After the labor and additional material cost are entered, the Item Information screen includes the additional costs. When an approved amount is promised or received by the supplier, that amount is entered in the Approval Info fields. The example below shows how the Item Information screen looks after the Cost Approved Information is entered.
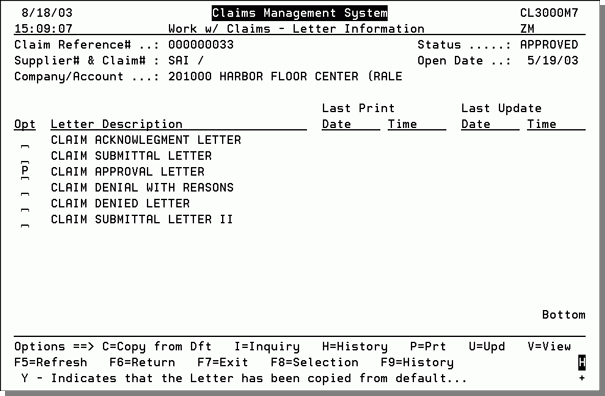
- The next step is to submit an approval letter. Because the Letter area was flagged for update, the next screen to appear in the process is the Letter Information screen. Select the Claim Approval Letter.
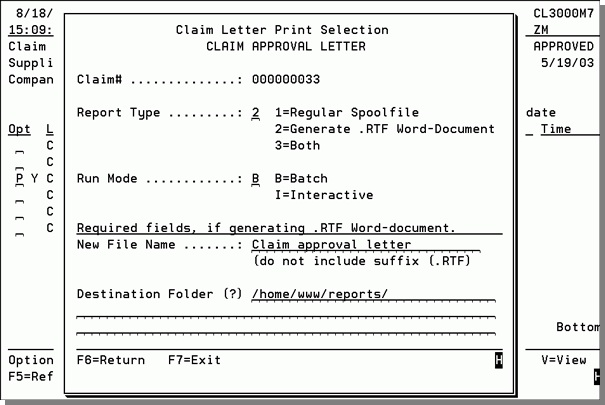
- A Claims Approval letter is generated pulling in details from other parts of the system. There are two options for printing the letter. Option 1 sends the letter directly to a printer and option 2 converts it into a Word document and sends it to a folder on your system. This way you can add letter head or make any changes that are needed. Enter a P for the letter you want to print and press Enter. The Claim Print Selection Letter window is displayed.
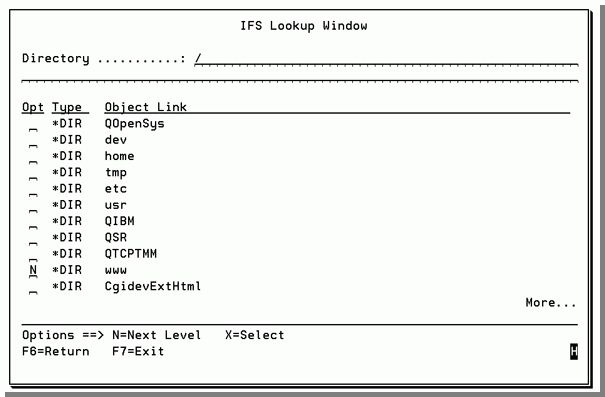
- Enter a Report Type and Run Mode. For the purposes of this example select to generate the report as a Word document. If you do not know the destination folder, you can drill down into the system to find one. When you do this a screen similar to the one shown below appears.
- Enter an N to drill down into an area and build the directory. In the example above, www is being drilled into to find a reports folder. As you go through this process, the system builds the directory.
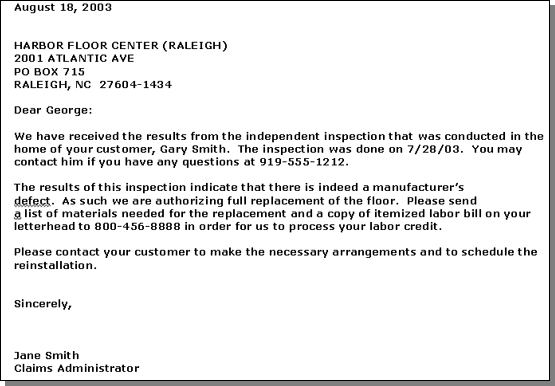
- From your PC folder you can open up the letter in Microsoft Word and enhance it as needed. A sample claims approval letter is shown below.
Inquiring About or Updating Item Information
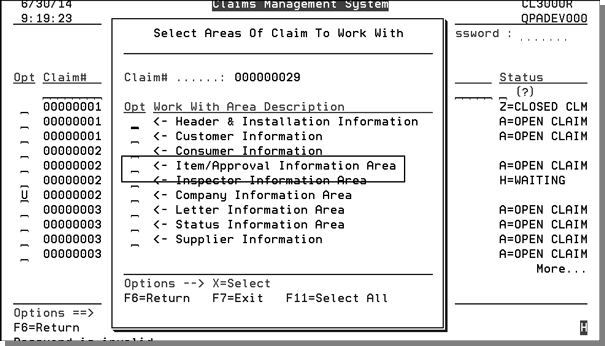
On the Select Areas of Claim window (accessed by entering a U in the Opt field of a claim on the Work with Claims screen, CLM 1), select Item/Approval Information.
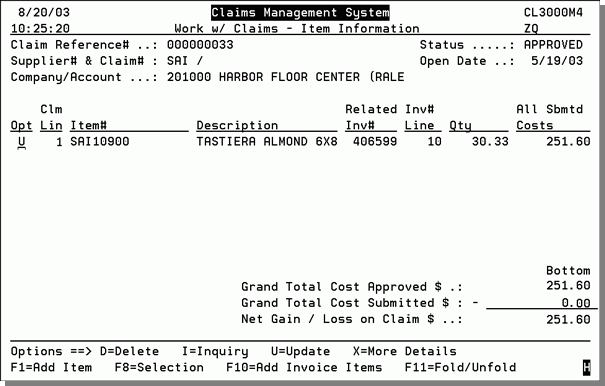
This screen displays any items you have added to the claim, or is blank for a new claim. You may add items from an invoice, using F10, or you may add items such as labor that were not necessarily on the original invoice, by using F1. This screen is used to calculate the value of a claim.
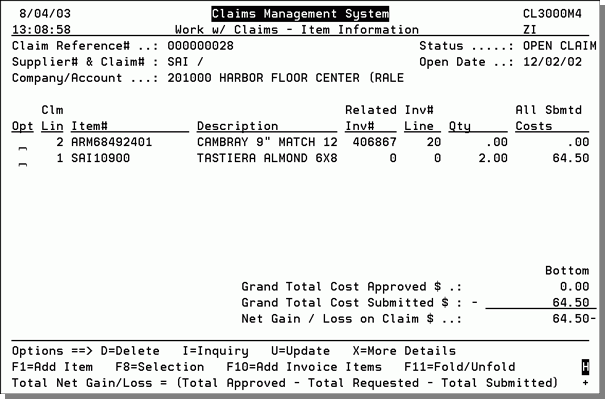
On the Work w/Claims - Item Information screen, you can do the following:
- Enter D beside an item to delete it.
- Enter I beside an item to do an inquiry.
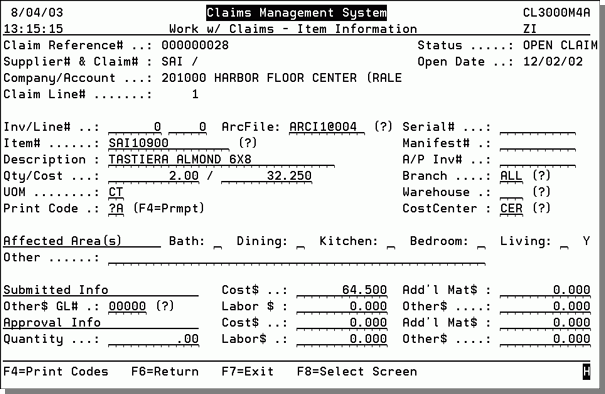
- Enter U beside an item to update it. The following screen appears.
- Enter X beside an item to see more details and assign user-defined codes, that further categorize and define the claim.
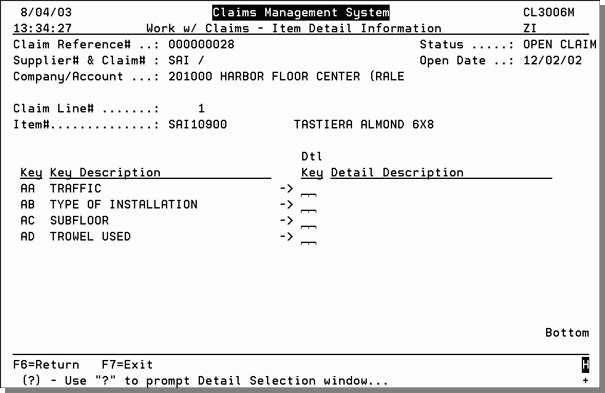
These additional details are created using the set-up options. Refer to Working with User-Defined Item Information - CLM 12 for more information on creating these details.
- Press F1 to add an item. An empty item information screen appears.
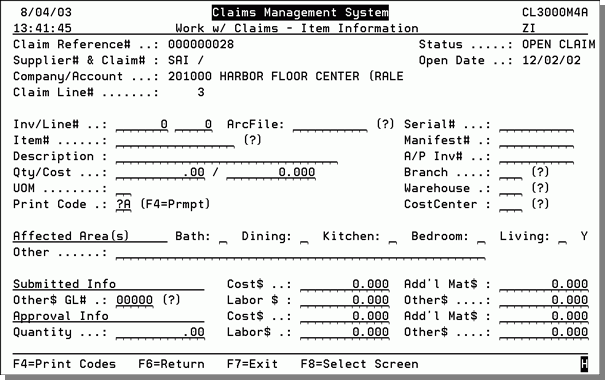
The fields on this screen are described in the table below.
|
Field |
Description |
|
Claim Reference# |
The reference number that is automatically generated for each claim. |
|
Supplier# & Claim# |
The supplier's code and reference number for this claim. |
|
Company/Account |
The customer account number. |
|
Claim Line# |
The system-generated line number for this item within the claim. |
|
Status |
The current status of the claim. |
|
Open Date |
The date the claim was originally opened. |
|
The Item Information fields, Inv/Line#, Serial#, Item#, Qty/Cost, Branch, Warehouse, Cost Center, and Submitted Cost$ can either be automatically populated or entered/changed manually. To have the system automatically insert the information, use the F10=Add Invoice Items function key on the Item Information Screen. This function allows you to select an invoice line from which to insert the information. |
|
|
Inv/Line# |
The invoice and line number related to this claim. |
|
ArcFile |
The archive file name if the claim is pulled from an invoice that has been archived. |
|
Serial# |
The claim item's serial number. This is pulled from the invoice. |
|
Item# |
The item number from the invoice/line number. You can change the item number if needed. This is allowed for cross-over items. |
|
Manifest# |
The manifest number that relates to the item's receipt. |
|
Description |
The item description for the item number. You can enter your own description. |
|
A/P Inv# |
The related AP invoice number for the item when it was originally invoiced by the supplier. |
|
Qty/Cost |
Quantity and unit cost information pulled from the invoice. This information can be changed as needed. |
|
UOM |
The unit of measure pulled from the invoice. The UOM can be changed as needed. |
|
Print Code |
If you want the item information to print on claims letters, enter the print code. If there is one item on the claim enter ?A. If there are two items on the claim, enter ?B to print the item information for the second item. Continue this pattern for any additional item information (i.e. ?C for a third item). These print codes (?A, ?B etc.) must be on the claim letter for the item information to be imported into the letter. |
|
Branch |
Default branch from the invoice. This information can be changed as needed. |
|
Warehouse |
Default warehouse from the invoice. This information can be changed as needed. |
|
Cost Center |
Default cost center from the Item File This information cannot be changed. |
|
Affected Areas |
Select the areas that are affected by the claim. |
|
Submitted Info |
The fields in this area are where you enter the amount submitted to the supplier for file back of claim. |
|
Cost$ |
This is the material cost submitted to the supplier. It is automatically calculated from the Qty/Cost fields. |
|
Add'l Materials |
Enter the dollar amount of additional materials involved with this claim. Examples of additional materials are adhesive and installation materials. |
|
Other$ |
Enter amount of submitted other cost such as freight. Entering other costs requires entries in the Other$ GL, Branch, Warehouse, and Cost Center fields. |
|
Other$ GL# |
This field is related to the Other$ field. Entering an amount there requires an entry here. When the claim is processed the funds entered for Other costs will be related to this GL account number. |
|
Approval Info |
The fields in this area are where you enter the claim amounts that the supplier has actually approved. |
|
Quantity |
The total claim quantity approved by the supplier. |
|
Cost$ |
The material cost approved by the supplier. |
|
Add'l Mat$ |
Additional material costs approved by the supplier. |
|
Labor$ |
The labor costs approved by the supplier. |
|
Other$ |
The other costs, such as freight, that are approved by the supplier. |
Adding Invoice Information to a Claim
- On the Work with Claims screen, select a claim to work with.
- On the Select Areas of Claim to Work With window, select Item/Approval Information Area
- On the Work with Claims - Item Information screen, press F10 to add the invoice information.
- Enter the Invoice # to retrieve the lines to select for claims. The lines are displayed.
- Select the line(s) or press F11 to select all lines.
- You can update the details and add details, as follows:
- Enter U in the Opt field to update an item. You can update the details that are displayed on the screen.
- You can enter additional costs, such as labor and additional materials submitted, for each line item.
- You can change the cost on this screen and the system recalculates the extended costs in the submitted information.
- You can change the warehouse and branch, but not the cost center for an item number.
- If you enter an amount in the Other$ field, the system requires an entry in the GL#, branch, warehouse, and cost center.
- Once a claim is approved by your supplier, go into Item Information screen for the lines and enter the approved amounts.
- You can add claim item information with just labor and/or additional materials only, or other$ only. The claim line does not have to have an item number.
- Enter X in the Opt field on the Item Information screen with item added, to enter more details.
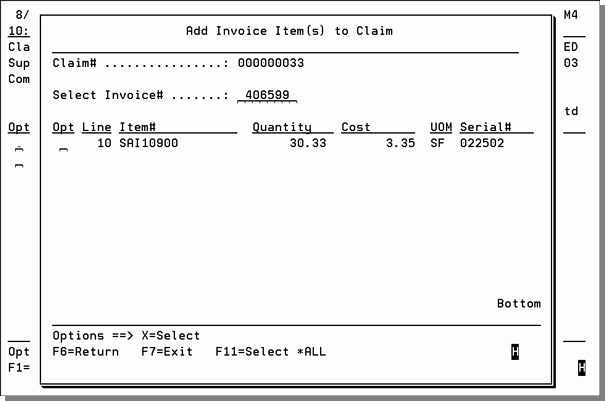
Once you've selected an invoice line item, or entered an item number, the next screen shows the amount and quantity to submit to the supplier. The amount shown is the quantity, cost, and extended cost from the invoice.
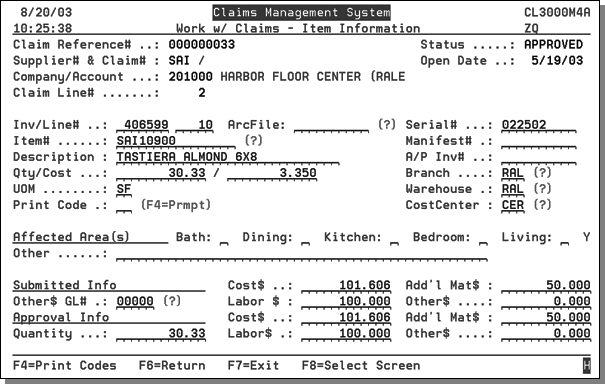
If you selected items from an invoice line number on the Add Invoice Item(s) to Claim screen, the system automatically inserts the item number, quantity, unit of measure, cost, serial number, branch, warehouse, and cost center. The extended cost is included in the subÂmitted information. The cost shown excludes rebates and/or cost allowances.
The Cost$, Labor$, and Add'l Mat$ fields are not automatically linked to the General Ledger. However, the accrual amounts required for creating journal entries are availÂable. For information on how to run a report that contains the amounts contained in these fields, refer to Claims and the General Ledger - CLM 24.
You can retrieve invoices from the Invoiced Archive File if you enter an archived file number. Enter a ? in the ArcFile Field to search the Archive Files.
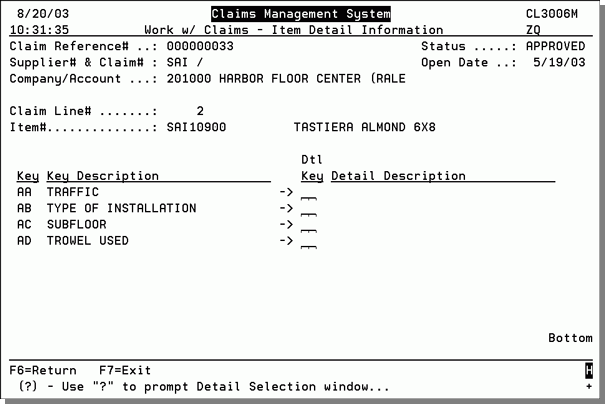
You can enter additional information about this line, such as how it was installed, the humidÂity level, or the type of traffic. These are defined in Working with User-Defined Item Information - CLM 12.
Enter a ? to select one of the different values available for the detail information. Think of the Keys as user-defined categories, and the Detail Keys as the values availÂable within the user-defined category.
Adding Labor and Installation Costs
- On the Work with Claims screen, select a claim to work with.
- On the Select Areas of Claim to Work With window, select Item/Approval Information Area.
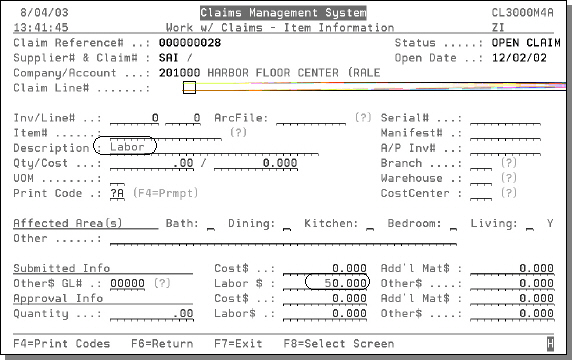
- On the Work with Claims - Item Information screen, press F1 to add the labor charge.
- For example, enter $50.00 in the Labor$ field and enter Labor as the description of the charge.
Adding Manufacturer Information
Once your supplier or manufacturer has responded to your claim request, you need to update that information in the Item Information screen.
- In the example below, the manufacturer has agreed to pay the full amount of the claim. Enter the costs in the applicable fields. In the example below, you have asked the supplier to pay the $101.606 cost of the material, plus an additional $50.00 for material, plus an additional $100.00 for labor.
- The next step is to update the status and close the claim out. This is also done using the Work With Claims screen.
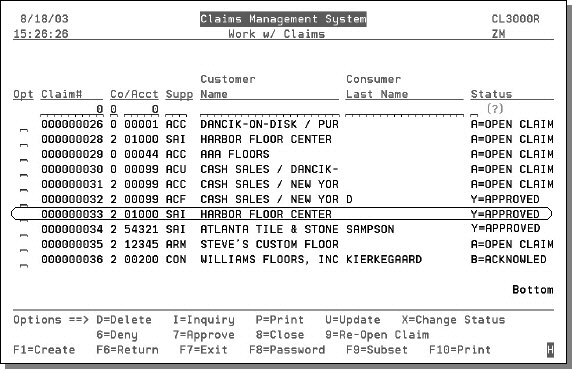
- Enter a 7 to move the claim into an Approved status and press Enter. The screen refreshes with the new approved status displayed.
- Use option 8 to close a claim (usually after you have issued credit or otherwise settled the claim).
- Use option 9 to re-open a claim that was closed prematurely.
To get to the following screen: CLM 1>Create or update a claim>select Item/Approval Information Area.
Printing a Single Claim Report
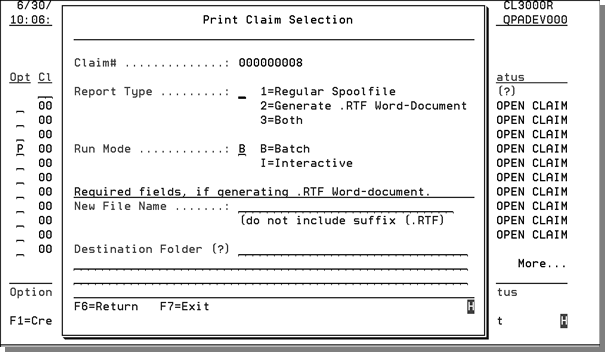
- On the Work With Claims screen (CLM 1), enter P in the Opt field beside the claim information you want to print, and press Enter.
- On the Print Claim Selection window, select a Report Type and Run Mode, and enter a New File Name, if you have selected to create a RTF Word document.
- Enter a Destination Folder, or ? to select a directory, if you are creating an RTF Word Document, and press Enter.
- Press Enter. On the screen that appears, enter Y for Detail Selection if you want to include costs, labor, and totals.
- Enter the appropriate choice for Notes Selection, and press Enter. Your report for this claim will be generated.
Changing the Status of a Claim
1. On the Work With Claims screen, enter X beside the claim you want to change the status for, and press Enter. Your list of available claim statuses is displayed.
2. Enter X beside the Opt field for the Description that reflects the new status of the claim.
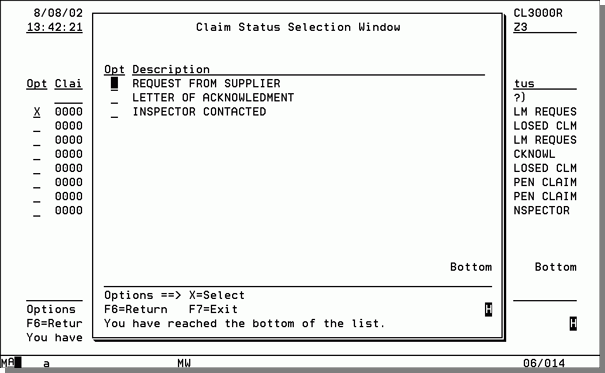
3. The system confirms that you want to change the status of the claim.
4. If you are going back in sequence, you are required to enter a reason. Going back in sequence means that you are changing to a status that normally precedes the status that the claim is currently at. This information is stored and can be viewed in the status history information area.
- The status of a claim may be changed in several ways:
- By entering X next to a claim in the Work w/Claims screen as shown above.
- By updating the Status Information Area.
- By using options 6,7,8, and 9 to Deny, Approve, Close, or Re-open a claim.
Approving or Denying a Claim
Denying a Claim
- 1. On the Work With Claims screen, enter 6 beside the claim you want to deny, and press Enter.
- 2. The system confirms that you want to deny the claim.
- 3. If you are going back in sequence, enter a reason.
- 4. Enter Y to confirm the denial, or N to cancel the denial.
Approving a Claim
- On the Work With Claims screen, enter 7 beside the claim you want to approve, and press Enter.
- If you are going back in status sequence, enter a reason.
- Enter Y to confirm the approval, or N to cancel the approval.
- If you select to approve a claim, the system checks the flag in the Global Settings to see if the approval amount is required before you are able to approve a claim (global setting - Allow Claim status change to Approval without Approval dollars). The system also checks for other error conditions.
The system automatically inserts the current date and time into the Date/Time Logged field. This time stamp is displayed throughout the Claims Management system when this claim is referenced.
Creating a Claims Subset
Breaking your claims down into subsets can let you organize and use the data they contain. For instance, it can be helpful if you want to look at claims against a particular item number or related to a particular inspector. The F9 Subset option allows you to group specific records using parameters you specify. Using the option codes provided you can make your subset search as narrow or as broad as needed.
- On the Work with Claims screen, press F9.
- The next screen to appear presents several subset options listed under the heading Field Descriptions.
- To use a parameter in the subset, enter an Op code and a Search Value for the Field Description. You can create the subset grouping for as many options as needed. Press F2 to see a listing and explanation of all the Op codes.
- For example, to create a subset of claims for a particular account, and a specific supplier and item number, enter the information as shown in the figure below.
- Press F2 to display the available OP Codes.
- After entering all your subset parameters, press Enter. The screen refreshes to display the results of your subset inquiry. The results are a subset of the claims on your system, which meet your selection criteria.
- Now that you have selected a subset of claims, if you have the proper authority, you can perform several functions (i.e., approve, deny, close, change status) from this screen. To investigate a claim further, enter a I in the Opt column and press Enter. The listing that appears allows you to select any part of the claim to inquire about.
- For purposes of this example, we are going to drill down into the item area for pricing information to see if this claim should be approved or denied. Select Item/Approval Information Area and press Enter.
- The other areas of the claim can also be used to gather area specific information or make updates.
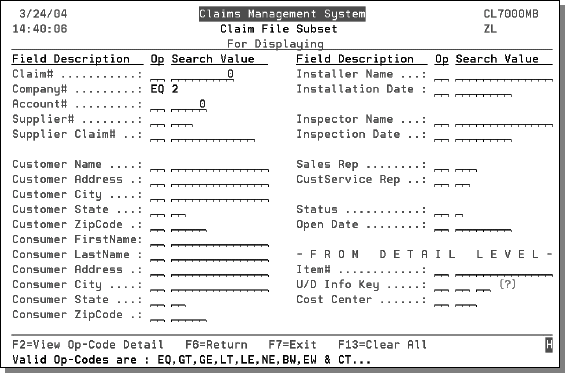
If you leave them all blank, they are all included.
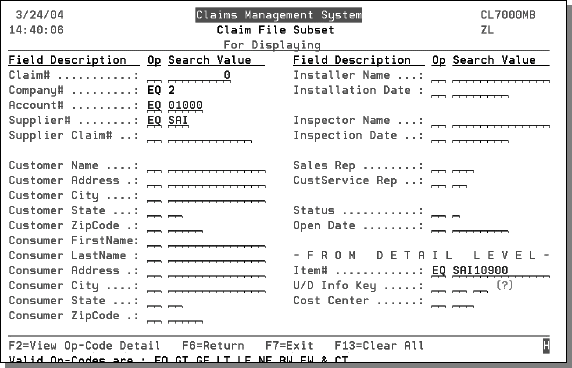
In this case, the exact account number, supplier, and item number are selected, so the Op Code EQ (for equals) is used. Other Op Codes may be used when multiple values are required, such as names containing (CT) Smith, or all item numbers beginning with (BW) ABC. The U/D Info Key field relates to the user defined data elements. For examÂple, an entry of U/D Info Key EQ_AA_T4 could mean to include claims with items that are for heavy traffic areas. The AA and T4 codes are examples of user-defined fields, which are likely to be different on your system.
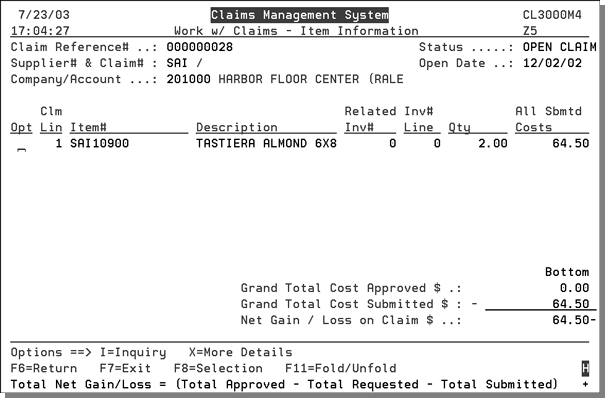
This screen can provide the pricing information you might need in deciding to approve or deny a claim. Using the Inquiry and More Details options you can drill down to find more information on an item. The Net Gain/Loss shown is the difference between what you have asked the supplier to pay, and what the supplier has approved to pay.
